Friday, 19 May 2017

Song#2 All on this farm- Idea Stage

I'm back with another song! In case you are new here, welcome to my 1 year blog on making 7 songs to propose to my beloved!

  1. Idea Stage
  2. Composing and Arranging Stage
  3. Recording Stage
  4. Mastering Stage aka apply-some-magic-time
  5. Final Product

Source

My girlfriend has this toy sheep which sort of bleats with a built in weighted air bladder when you flip it upside down, then right way up again. So, I thought of like, why not make a song that can utilise that fake sheep bleat?

What better than Old MacDonald's nursery rhyme? You see, that song is kinda like under the country genre, and it involves most of the animals on his farm...so I went about binging on the latest country and bluegrass music available.

I came across talents like the family Sleepy Man which is god damn awesome with their banjo playing, and the Dead South, all great inspiration for my song. In all honesty, I considered learning the basics of banjo riffs, and all other bluegrass instrument playing but I concluded that's going to take a long-long while.

So, I settled for the next best thing, getting existing loops. I've used loops quite often in my songs, from guitar riffs to melodic lines from the giant Loopmasters's free 'Excite Promo 2015' pack that came with my Novation Launchpad Pro. It was then I got to know the original site called Loopmaster, being a platform for audio loop packs that can run individually as audio files, Kontakt files, Ableton and many more.

I just searched their site can Boom! came out the exact loop pack that I wanted - Bluegrass pack by Bigfishaudio.  They featured demo stuffs like 'old-timey, folk and country' tunes with sets consisting of acoustic guitar, banjo, mandolin, bass and djembe (which is some kind of portable lap drum). So, I went ahead with that pack and used it with Kontakt, which for those of you who aren't familiar with samplers, Kontakt is basically a plug-in for your DAW and it plays loaded samples or instruments. Kontakt has been around for ages and is much like a multi-platform plug-in (works with most of the DAW softwares like Reason, Cubase and Ableton) and thus have wider selection in terms of 'audio patches' and samples libraries.

But most importantly, I had to choose a name for this song.... which initially was a rather cringy name like 'And there was a lamb'. However, as you can see, the title of this post is somewhat different due to the phrase being plucked out of the lyrics (as this post was written post song publication). In the end that phrase was from the last line of the chorus, and it fit the #2 song's initial lineup of the M-A-R-R-Y-M-E plan.

Long story short: Song name is 'All on this farm', using bluegrass loop pack and is animal themed.

Stay tuned for Part II of  V for this song!

Thursday, 2 March 2017

Song#1 Missing Piece - Final Product

Good morning! Here's the last part of the 5 part series. Let's get it going!
  1. Idea Stage
  2. Composing and Arranging Stage
  3. Recording Stage
  4. Mastering Stage
  5. Final Product
Here's the intro blog on everything you need to know here :)

Soundcloud upload

With the audio completed, I uploaded it to my Soundcloud account in full glory, where you can listen in relative HD below


Preparing the Music Video

To prepare the music video for this song for upload on my Youtube account, I used my trusty Adobe After Effects CC.

What I had in mind was to create some sort of music visualiser spectrum, like those you see in iTunes. After some searching online, I came across this great resource video teaching exactly that:


I went for the simplest animation as possible with pink/maroon lines for the spectrum and the song title in the middle. I added my profile picture in the corner so that I could create Youtube annontations for viewers to click-to-subscribe later (though it was unnecessary with the latest 'end-card' tool)


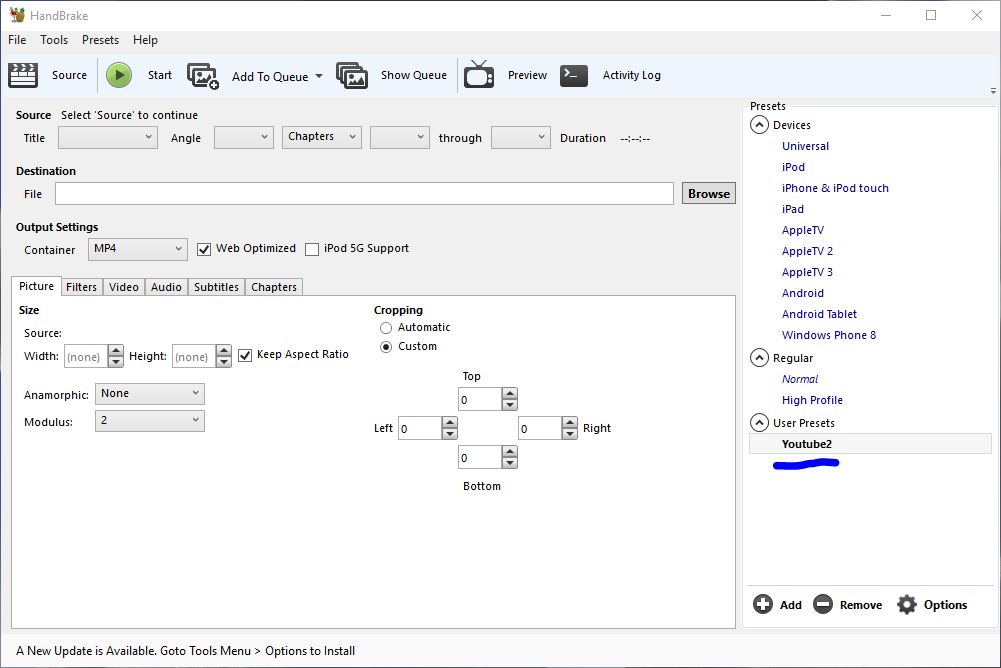
The only problem with the rendered output from After Effects is that the file is a freaking 19.4GB large!! Lucky the freeware gods has graced us with Handbrake, a video utility which I used to compress the file into a manageable 18.1MB. Here's how I did it:

  1. Previously, I've saved a settings profile specifically for Youtube uploads as in this picture below.

    Youtube settings profile
  2. Here are my settings for that
  3.  Be sure to click 'add audio tracks' or else your video won't have any

Final Product

Without further ado, let me present to you the final music video!


 PS. My gf loved it! Score one for song #1!!😄

Sheet music free DL here
https://www.4shared.com/office/7kmSWVy9ba/Missing_Piece.html

Wednesday, 1 March 2017

How to add hidden text to your audio

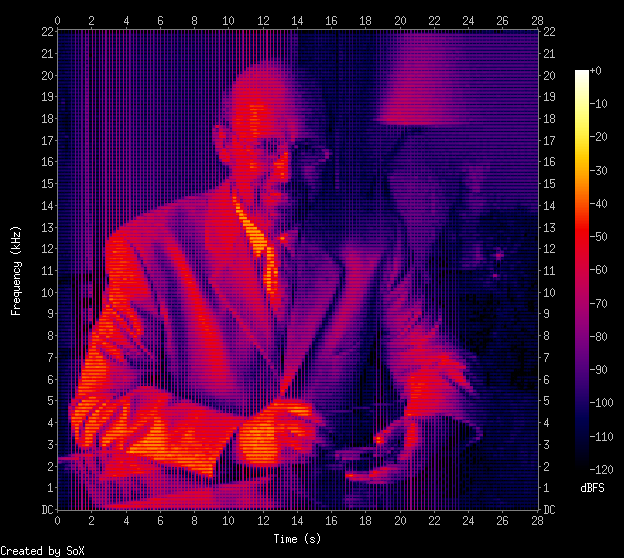
I've always liked cool stuffs like subliminal advertising or hidden stuffs in soundtracks like Undertale. So, one day I looked up on inserting specifically 'text' into audio and found several resources online (which I'll link below).

Spectrogram image courtesy Marco Barnig

Software needed

Basically I used Audacity for editing and viewing the spectrogram and Coagula for converting images to audio. Once you've installed Coagula, your launch screen should show a few windows and a blank canvas. Go to File>Open Image and select the image you have created. I've created mine using MS Paint and I tried to minimize the blank spaces around the text. Also, it's best if you use white text on black background.

Coagula interface
After that, when your picture loads up like mine, select Sound > Render without Blue. Coagula will play your odd sounding text once its done.

When you're done there'll be a new audio file entitled "Coagula.wav" will be in the same folder as the Coagula application. You can either use that file or you can save it out to a location of your choice by choosing File>Save Sound As as from the file menu.

Once I loaded the .wav file into Audacity, I reduced the volume of the sample by  Effect>Amplify and selecting negative decibels amplification. If your hidden message is louder than your original song, I think it'll be kinda hard to mask your intentions, right?

I dropped the volume to about -50dB and had to zoom in the near flat waveform. To view your message, click the dropdown arrow next to the 'msg' word to select Spectrogram. The file will look like this:

Spectrogram view
However the bottom half of the text still looks distorted. Here, click the dropdown arrow menu to select Spectrogram Settings, which will bring up this window:

Here change the Scale to Logarithimic and press Apply/OK.

Voila! Your hidden message  in both Left and Right Audio

More resources!
Marco Barnig's writeup on the spectrogram thing> http://www.web3.lu/spectrogram-speech-processing/
Lifehacker's own guide to embedding messages > https://lifehacker.com/5807289/how-to-hide-secret-messages-and-codes-in-audio-files

Song#1 Missing Piece - Mastering Stage

Ding-dong ding-dong! It's part 4 of 5 today, le Mastering Stage! -ragequits-
  1. Idea Stage
  2. Composing and Arranging Stage
  3. Recording Stage
  4. Mastering Stage
  5. Final Product
As always, please visit this project's intro blog. 

Mastering

After obtaining the MIDI data from my Clavinova in the previous post, I transfered it to my DAW (digital audio workstation) of choice, Ableton Live. Honestly, I've been learning and using Ableton for the past few months in earnest, though I had the program a year back.

A funny story here was that me and my neighbour Chu-Gen were supposed to learn the software together over his summer break. I provided him with the MIDI devices, like my Korg MicroKey and my Novation Launchpad Pro, in exchange for him teaching me how to use the program. It goes without saying that, that deal fell through with both of our busy schedules.

I started referencing online tutorials, blogs and the software manual itself (which is pretty darn good at explaining everything with cringe-worthy jokes inside) before I tried it out on a wedding dedication song before this blog started.

Back to the song at hand, I rigged up the MIDI direct into the arrangement page as you can see below

Arrangement View
 Here's my settings for the instrument chain:
Devices settings
As you can see here, I tweaked the macro reverb level to get that pearly pearly Steinway sound (though I don't think its anywhere comparable to the real thing). To get deep into the settings, I expanded the reverb chain and tweaked the decay time, reflect and diffuse to get the sound I wanted.

Then I threw in a stock preset EQ8 for piano by Ableton called Piano EQ2 which boosts the lows and highs. Since I did the reverb settings on the Instrument itself, I turned off the Master Reverb settings but I put a Limiter under the Master as shown below:

Limiter in the Master


A Limiter helps prevent the listener from having sudden loud audio blast their ears to the moon, but also helps set the target listening level - which I set to 3.50dB (since the source MIDI is rather soft).

The song in Audacity
In the above picture, I've imported the song into a freeware audio editing program called Audacity. Here's a secret, somewhere in that audio waveform I've added an extra something. Can you spot it?

Spectrogram form
I've given you some help here. This hidden extra can only be seen in Spectrogram form. Still cannot see it? All right, I'll zoom in the end of the song for you guys n girls!

Hidden message!
There you go! My proposal at the end of every song from now on! The only problem with adding these kind of stuffs to the song is that you can actually hear it if you listen carefully. 

If you're interested in adding hidden stuffs in your audio, I've written a post on it here.

Stay tuned for the final Part V of  V for this song!

More info!

Paul Cantrell has a great resource on mastering the real piano recording itself, you can check his blog here> https://innig.net/music/recordings/method/mastering.html

Tuesday, 28 February 2017

Song#1 Missing Piece - Recording Stage

Ding-dong ding-dong! It's part 3 of 5 today, which means RECORDING DAY! -ragequits-
  1. Idea Stage
  2. Composing and Arranging Stage
  3. Recording Stage
  4. Mastering Stage
  5. Final Product
In case you are new here, here's the intro blog.

Recording

Me practicing for recording
There are several approaches to recording your own compositions, namely:

  1. Practice like you're going to perform in a concert
  2. Simply sight-read your way through with multiple takes then go through editing hell
  3. Practice until you can get 95% accuracy and lightly edit (I did this)
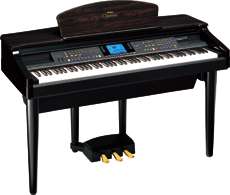
 I used the instrument of choice, which is practically the only piano I had lying around for the past 20 years which is a Yamaha Clavinova CVP-107

The info panel underneath
And so I hooked up my favourite earphones (it's d-Jays by the way) to get more privacy during mistakes made. Like typical 'industry practice', I stuck all music sheets together in one continuous page to avoid page turning.

All stuck together
Angel and Gnome of Pianistic Studies
I did about like seven takes before I got the final take to 95% accuracy (lucky me). Also, advice from the pros - record at night, because there's no one to disturb you :)


The Final Take, phew!
 One thing neat about this old Clavinova is that back in those days, they had about 20kb of internal memory, which is insufficient for this song. They included a diskette or a floppy disk interface where you could add memory and transfer the MIDI recorded elsewhere.

Still working like new!
 After I spent about like a paltry 100kB of memory (in today's standards) for seven takes, I used the Step Edit function to individually edit notes, timing and velocity of the MIDI.
For those of you who still have this relic of a Clavinova, you can access it by pressing the Rec button > Next Pg button until you see the Step Edit selection. Pressing the perimeter button will ask you to wait few seconds to reach the display below:
Step Edit function
So basically I went through the whole song and combed it for any mistakes and whatnot. Editing was done via the 4-5 buttons below which are:
  1. Timing - which is when in the music that the note starts playing
  2. Note Number - the note on the keyboard
  3. Velocity - how loud/soft the note is
  4. Gate Time - the duration of the note
Items and their meanings
Again, I spare the readers from the details of MIDI editing through the Step Edit Function, which you can read at length from the instruction manual linked below.


After editing I saved it back onto the floppy disk to be transferred to my PC. For starters, finding a floppy disk to USB reader wasn't easy nowadays, considering the extinction of the format itself. Honestly, I'm pretty surprised that my floppies still held up all these years! <fingers crossed>

On another note, I have thought of recording direct through the headphone cable to the microphone port of a laptop, as I've did previously on other songs like the Ballad of the Green Mats. Unfortunately, the audio artifacts and the cable interference is too much to remove through audio editing, so I scrapped the whole idea altogether. Probably it's due to the connection ports being rusty or something.

Stay tuned for Part IV of  V for this song!

More info!


Instruction manual - https://www.manualslib.com/products/Yamaha-Clavinova-Cvp-107-36125.html
Product info - http://usa.yamaha.com/products/musical-instruments/keyboards/digitalpianos/cvp_series/cvp107/

Sunday, 26 February 2017

Song#1 Missing Piece - Composing and Arranging Stage

How's your day? This time I'm back with part 2 of 5. Here, it's all practically about arranging, as the composing was done earlier. Also, I've settled on the name of this song - Missing Piece, since the music represents the ups and downs of a relationship, but in the end he/she is your missing piece in this world.
  1. Idea Stage
  2. Composing and Arranging Stage
  3. Recording Stage
  4. Mastering Stage
  5. Final Product
In case you are new here, here's the intro blog.

Arranging

In this section, I introduced more complex chord structure to the existing RH melody by adding the 7th, 9th or 11th. 
Basically, if its a C chord, I'll add the 7th note (Bb) to become a C7 chord:
C-E-G-Bb
I'm not going to go into the details of music theory here, but you can check out the links at the bottom for more info

In other words:
 

 becomes

Doing this addition of notes makes the chord sound richer, something like adding spice to the soup.
Next, I fixed the last section before the ending recap of the theme:

Where previously, the melody seemed a little all over the place...

I settled for a somewhat joyous celebratory melody with the same LH notes

 Also, I tidied up several sections, just to maintain the uniformity of the pattern, like:

BEFORE


 AFTER


Spotted the difference?

Song Analysis

If you're still with me and not screaming at the screen, here's the breakdown of the finished song:

The Scream - Munch
  1.  Intro
  2. Verse 1
  3. Motif/chorus
  4.  Verse 2
  5. Motif/ chorus variation 1
  6. Verse 3
  7. Motif/ chorus variation 2
  8. Verse 4
  9. Motif/ chorus variation 3
And here's the finished score!

https://www.4shared.com/office/7kmSWVy9ba/Missing_Piece.html

Stay tuned for Part III of  V for this song!
More about chord theory here!
https://inztro.blogspot.my/2013/12/the-11th-piano-chords.html
https://guitarsix.com/blog/lessons/chord-construction-part-3-7th-chords-and-beyond/132/1/

Sunday, 19 February 2017

Song#1 Missing Piece - Idea Stage

Hi everyone! I'm finally back with an update! In case you are new here, welcome to my 1 year blog on making 7 songs to propose to my beloved! So here's how each blog on every song would be formatted:

  1. Idea Stage
  2. Composing and Arranging Stage
  3. Recording Stage
  4. Mastering Stage aka apply-some-magic-time
  5. Final Product

Source

When I was thinking about what would best be for the first song of the proposal, I thought of doing a piano instrumental. After all, I'm an amateur pianist first before being an composer/arranger.

I actually had a few good source material from my old collections of Random Impromptu Playing (such a mouthful!). Try hearing my Random 3 below.


Ta-daa! I'd admit that wasn't very polished after all. I just made that up in one sitting at the keyboard some 5 years ago.

During the playing process, I utilised a simple Left Hand accompaniment style and a recurring musical hook (at 1'56"). I also jumped around the keyboard, using the higher octaves and lower octaves before changing the style nearing the end.

I guess this song has no conventional structure unlike typical pop songs (part A-part B-Chorus)

Next, I set about to transcribe what I recorded from MIDI into Finale, which looks horrendous like this


which is totally out of alignment (given that I didn't record based on the keyboard metronome) and looks terrible.

Transcription

And so, I transcribed the whole thing again into legible score (phew!) which you can download for free below!

PDF - https://www.4shared.com/office/OJQbehEYba/Random_3.html
XML - https://www.4shared.com/document/WY675QSVce/Random_3.html

Stay tuned for Part II of  V for this song!